FF8 Inspired Shader
Keywords
Background
I’ll be sharing the journey I took to learn how to write shader code from someone who didn’t know what a fragment shader is to creating a battle scene transition for my game written in Godot 4.4. The battle scene transition is inspired from Final Fantasy 8.
Before being able to create the transition like above, I started with learning the basics and fundamentals of shader code through fragment shaders. From my understanding, a fragment shader is a function you write using glsl whose return value is a color value in the form of (r, g, b, a). The fragment shader function runs in parallel on the GPU to generate colors that gets displayed on our computer screens. The inputs involve the texture or image you’d like to apply shader effects to where you can sample its color data via the texture() function in glsl and the UV position data which is a 2D coordinate space whose ranges go from 0 to 1 for both the horizontal and vertical axes. Since you are given only the UV coordinate of a texture in the fragment shader function, you don’t have control over which UV coordinate to access at a particular time. So how does one create shader effects with this limitation?
Short answer: math!
Baby Steps
Beginning my journey on shaders, I learned about dot products, step functions, smoothstep functions, inverting values by subtracting the result of a value by 1, and how multiplication can be used to blend 2 colors together. At the end of the first day of learning, I was able to get a shader that would diagonally appear from the top left corner to bottom right corner filling it with a light blue color:
Code Snippet in Godot 4.4 GLSL
void linear_gradient_diagonal(inout vec4 color, vec2 uv_pos) {
	vec2 diagonal_point = vec2(0.0, 0.0);
	vec2 diag_point_to_uv_pos = uv_pos - diagonal_point;

	// gives us the squared distance between diagonal_to_uv vector and diag_direction vector
	float dist_from_diagonal = dot(diag_point_to_uv_pos, diagonal_direction);
	float alpha_value = 1.0 - step(percentage, dist_from_diagonal);

	color.a = alpha_value;
}
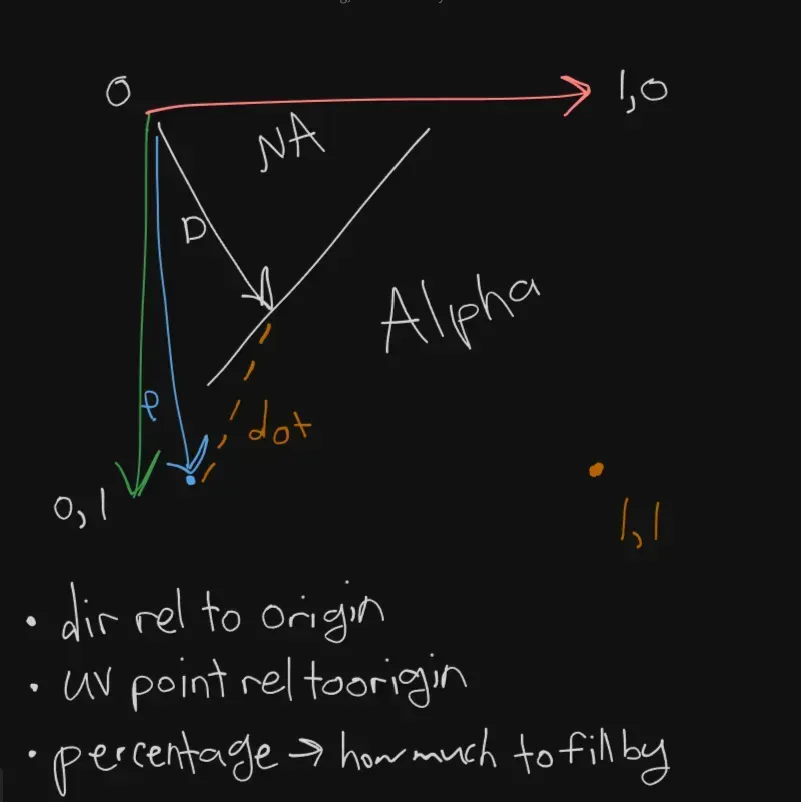
Legend
- D = diagonal_direction
- P = UV position of a pixel fragment provided by the fragment shader function
- NA = pixels that have alpha value > 0
- Alpha = pixels that have alpha value = 0
Code Explanation
- dot product is taken between P and D to find the squared distance between the 2 vectors so that in the next step, we can determine if the squared distance is close enough to the percentage parameter which can be controlled by us in code.
- the step function acts as an if statement:
if percentage > dist:
  set pixel alpha value to 0
else:
  set pixel alpha value to 1
- The step function acts like an on/off switch for a light bulb
- You invert the result of the step function by subtracting with 1.0 so that the side where alpha value > 0 is visible on screen and the side where alpha value should be 0 are pixels on UV that are further away from the direction vector D
It was a lot to take in for the first day as I’m used to writing code by checking which cell in a 2D array has some property enabled or iterating through rows then by columns rather than thinking about how you can manipulate color of a texture in parallel through the GPU.
Taking a screenshot and saving it to RAM
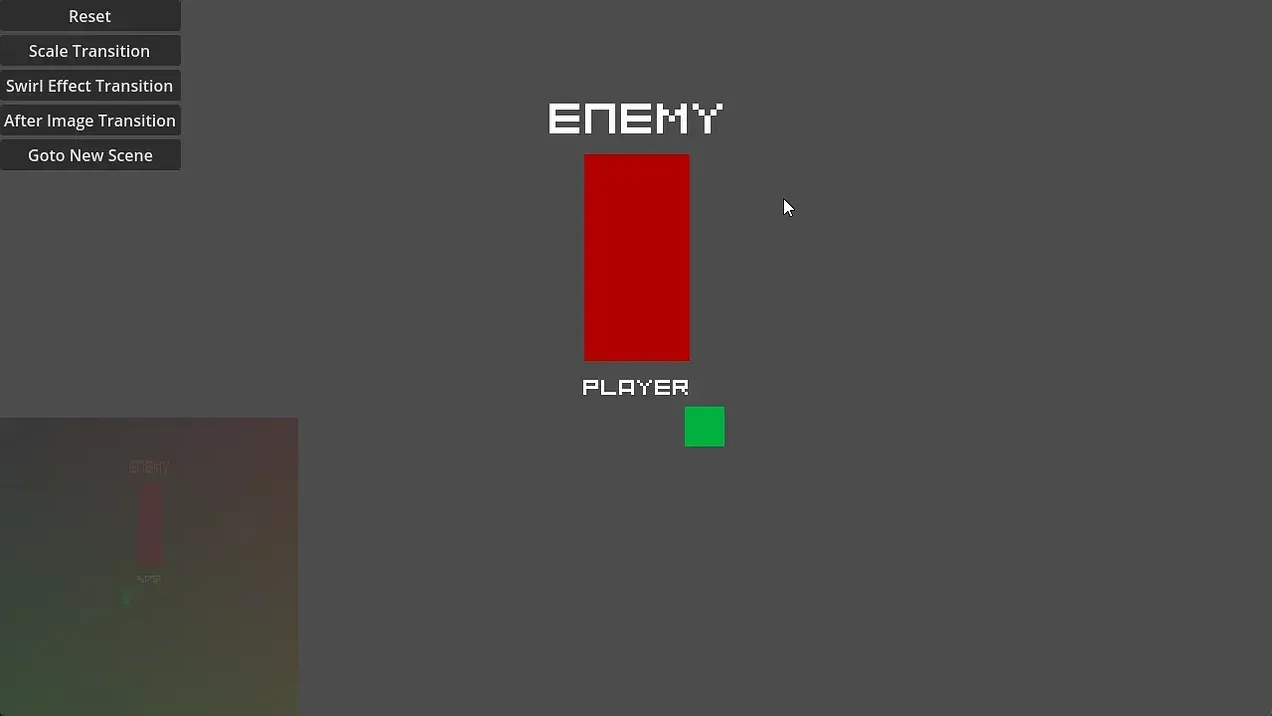
The shader program I’m about to write needs a texture to sample from. Why? To apply the shader effects on top of which is sort of like applying post processing effects to a video being edited. The sample texture the shader program uses will be the last frame right before the player encounters the enemy. For demo purposes, I press the “After Image Transition” button to simulate the battle transition.
The screenshot gets saved to RAM because I don’t want the screenshot to stay on my computer for a longer period of time. Alternatively, I could have saved it on disk but I would have to programmatically delete it to prevent having additional screenshots saved on my computer.
Bottom Left corner is screenshot of the game with a color shader applied on top of it:
Steps I took to achieve the cinematic shader effect
- Create a TextureRect Node in the Godot scene
- Create a script and attach it to the TextureRect Node
- In the script, instantiate a ShaderMaterial instance and attach it to the node’s shader material
- In the
_ready()function block, callload_shader(shader)to have shader resource upon when game first boots up - Create a function called
capture_image()which will be called on a key is pressed on the keyboard to capture the image - To get the image from the viewport, Godot has a built in function chain called
get_viewport().get_texture().get_image()that obtains the viewport’s texture as an image. Before getting the image, one should call theawait RenderingServer.frame_post_drawfunction which will wait until Godot’s rendering system finishes updating all of its viewports then function logic will resume. Credits go to FencerDev for figuring out how to grab image data from the game’s viewport. Watch his youtube video here. - Create an
ImageTextureusingImageTexture.create_from_image(screenshot)which will allocate memory to store the image into anImageTextureresource - Finally, assign the script’s texture property to be the
image_texture
Challenges I ran into
- When writing fragment shader code, the final shader output should be a blend of the
image_texturergba channels and the shader’s rgba channels. One mistake I made was setting the final color value in the fragment shader onto the texture which resulted in overwriting the original image captured with the shader image generated. - The blending of 2 pixels can be done via the multiplication operator!
# written in gdscript Godot 4.4
extends TextureRect

@export var screenshot: Image
@export var shader: Shader

func _ready():
	self.material = ShaderMaterial.new()
	load_shader(shader)

func capture_image():
	# wait til all drawing is complete for the processing frame
	await RenderingServer.frame_post_draw

	# this fills up viewport width and height in pixels which is defined in
	# Project Settings -> General -> Display -> Window
	screenshot = get_viewport().get_texture().get_image()
	assert(screenshot != null)

	screenshot.resize(300, 300, Image.INTERPOLATE_TRILINEAR)

	var image_texture = ImageTexture.create_from_image(screenshot)
	assert(image_texture != null)
	print ("screenshot dimensions: %d x %d" % [screenshot.get_width(), screenshot.get_height()])
	print("image captured")

	self.texture = image_texture


func load_shader(shader_to_load: Shader):
	var shader_mat = self.material as ShaderMaterial
	shader_mat.shader = shader_to_load
	assert(shader_mat.shader != null)

# can be its own script to update the uniform properties of a shader over several frames
func update_shader_properties():
	pass

func _input(event: InputEvent):
	if Input.is_action_just_pressed("screenshot"):
		capture_image()
		print("capturing image")
Shader Sample Applied on top of screenshot
shader_type canvas_item;

uniform float alpha_val : hint_range(0.0, 1.0) = 0.25;
void fragment() {
	vec3 color = vec3(uv_pos.x, uv_pos.y, 0.0);
	// make sure to multiply to blend the image texture and shader colors together
	COLOR *= vec4(color, alpha_val);
}
3 Shader Effects
Following section goes over the 3 different shader effects I combined together to form the shader effect at the top of this page.
Brightness Shader
# this controls how much light this pixel should receive
# the idea here is to approach a value of 1.0 which is the
# max color value the rgba channels can reach up to which
# represent fully in that color whereas 0.0 represent black
resulting_color.rgb = resulting_color.rgb + resulting_color.rgb * vec3(light_percentage)

vec2 offset_point = vec2(0.25, 0.0);
float dist_from_offset_point = dot(uv_pos - offset_point, uv_pos - offset_point);

float light_magic = smoothstep(uv_pos.x, uv_pos.x + 0.5, dist_from_offset_point) - smoothstep(uv_pos.x - 0.5, uv_pos.x, dist_from_offset_point);

resulting_color.rgb = resulting_color.rgb + resulting_color.rgb * vec3(light_percentage) * (1.0 - light_magic);
- offset_point is a UV position on the texture that is roughly located at 25% from the texture’s origin point.
- dot product is used to obtain the squared distance of the difference between the current uv_pos and offset_point. Its used in light_magic to determine how much brightness to apply in a given texel in a fragment shader.
- smoothstep is an interpolation technique where its used to interpolate from 1 color to the next gradually rather than changing its color from 1 uv coordinate to the next drastically.
resulting_colormath breakdown- When you add 2 colors together, it increases the brightness of a texel’s color. All this means is that a value of 1 on all color channels is max brightness or the color white and value of 0 on all color channels is the absence of color or the color black.
resulting_color.rgb * vec3(light_percentage) - light_percentageis a tweakable value in the godot editor I exposed for the shader material to control how much brightness is exposed in the final texture render. 0 means no light applied and 1 means all light applied.1.0 - light_magic- this is applied to give the lighting a diagonal look to it
Black Fade Shader
# x_shifter controls if the current pixel should be painted black or keep its relative color
resulting_color.rgb = (1.0 - smoothstep(0.0, uv_pos.x, x_shifter)) * resulting_color.rgb;
Motion Blur Shader
# 1. obtain neighboring fragment
# 2. obtain X texture color samples between current fragment and neighboring fragments
# 3. calculate average value of ALL sampled pixels including current and neighboring
# 4. assign it to the resulting color
const int SAMPLE_COUNT = 64;
vec4 texture_samples[SAMPLE_COUNT];
vec2 curr_pos = uv_pos - right_offset;
for (int i = 0;i < SAMPLE_COUNT; ++i) {
	texture_samples[i] = texture(main_texture, curr_pos);
	curr_pos -= right_offset;
}

# this paints the average value from all sampled points
# on frag shader. when applied to the entire
# texture it creates a motion blur effect
vec3 avg_color = vec3(0.0);
for (int i = 0;i < SAMPLE_COUNT; ++i) {
	avg_color += texture_samples[i].rgb;
}
avg_color += texture_color.rgb;
avg_color /= float(SAMPLE_COUNT);
- The trick behind this one is to sample texels via the
texture()function and obtain the nighboring color data. This grabs 64 color samples to the left of the current texel. - Obtain the average color value and return it as part of the output
- Using
texture()function call multiple times in a fragment shader function might not be good for performance AND may need to be profiled if game being ported to a specific game console has tight memory and/or performance constraints.
All the Code Together
shader_type canvas_item;

// number of textures to sample for the smear/blur effect
const int sample_count = 256;

uniform float light_percentage : hint_range(0.0, 1.0) = 0.0;
// used to obtain neighboring fragments
uniform float pixel_offset : hint_range(0.0, 0.1) = 0.0;
// amount of fade to apply in the UV coordinate space
uniform float fade_offset : hint_range(0.0, 1.0) = 0.0;
// screenshot to sample pixels against
uniform sampler2D main_texture;

float brightness_calculator(vec2 uv_pos) {
	vec2 offset_point = vec2(0.25, 0.0);
	float dist_from_offset_point = dot(uv_pos - offset_point, uv_pos - offset_point);

	float dark_magic = smoothstep(uv_pos.x, uv_pos.x + 0.5, dist_from_offset_point) - smoothstep(uv_pos.x - 0.5, uv_pos.x, dist_from_offset_point);
	return (1.0 - dark_magic);
}

float black_fade_calculator(vec2 uv_pos, float shifter) {
	return (1.0 - smoothstep(0.0, uv_pos.x, shifter));
}

vec3 compute_average_color(vec2 uv_pos, vec2 offset) {
	// smear effect -- reference (https://discussions.unity.com/t/smear-effect-on-texture2d/874107/2)
	// 1. obtain neighboring fragment
	// 2. obtain X texture color samples between current fragment and neighboring fragment
	// 3. calculate average value of ALL sampled pixels including current and neighboring
	// 4. assign it to the resulting color
	vec4 texture_samples[sample_count];
	vec2 curr_pos = uv_pos;
	vec3 avg_color = vec3(0.0);
	for (int i = 0;i < sample_count; ++i) {
		texture_samples[i] = texture(main_texture, curr_pos);
		avg_color += texture_samples[i].rgb;
		curr_pos -= offset;
	}
	avg_color /= float(sample_count);

	return avg_color;
}

void fragment() {
	// apply motion blur/smear effect by sampling neighboring pixels based on x_offset value
	vec3 color = compute_average_color(UV.xy, vec2(pixel_offset, 0.0));
	// apply brightness from top left corner
	float light_magic = brightness_calculator(UV.xy);
	// apply black fade transition
	float black_fade = black_fade_calculator(UV.xy, fade_offset);

	// mixing all the results together
	color = black_fade * (color + color * vec3(light_percentage) * light_magic);
	COLOR = vec4(color, 1.0);
}
Closing Thoughts
I only touched the surface of shaders as there are plenty of more topics to learn like how to profile shader performance and what kind of tools to use to help reduce performance bottlenecks on game consoles that have weaker hardware specs than a gaming PC.
If you found this helpful, or would like to learn more, please send me a DM on my LinkedIn.